Angular architecture ready book

In this article we are going to learn how to scaffold new angular application with clean and maintainable and extendable architecture in almost no time and what are the benefits of doing so, we will also discuss the most reusable services and feature specific components.
I am inspired by Tomas Trajan angular architecture blog. I am explaining same concepts with different examples and tools.
From last year I am learning angular and have been developed more 9 to 10 applications. So with that understanding pitching in these concepts.
this article brings all lessons learned in a distilled cleanup form you to cut down your learning curve and help you guys create angular project epic.
Starting a project
- Need Angular CLI, download it using npm
npm install -g @angular/cli
as of now(November 2020) the current angular version is 10.2.1and I would strongly recommend to create new apps using that version (or any latest versions) and start using goodies like IVY or --strict flag right from the beginning
- IVY is a rendering engine for Angular which minifies the code into very minimal size.
- strict flag enabling initializes your project with few new settings that improve maintainability , help you catch bugs ahead of time, and allow the CLI to perform advanced optimizations on your application. Additionally, applications that use these stricter settings are easier to statically analyze, which can help the ng update command refactor code more safely and precisely when you are updating to future versions of Angular.
As a coding enthusiast, always try to update angular to the latest version by running below command on your timeline.
npm i -g @angular/cli@latest
First after installing angular cli, we have to generate fresh new Angular workspace and this can be achieved by running
ng new angular-arch --create-application false --strict
- angular-arch is project name
- ”create-application false will create an empty workspace
- ”strict will adjust the values of some Typescript compiler flags to nudge us to do right things
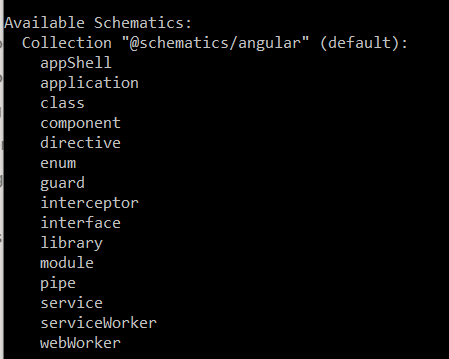
to see available schematics type ng g
Application
In the list of available schematics contains one called application and we will use it to create our first application in the workspace by running
ng g application my-ang-arch --prefix my-ang --style scss --routing
- my-ang-arch will be created in the projects folder. It will have angular router and will be using Sass styles ( with .scss file extension)
- ”prefix will be used in the name of every component tag and directive selector so we will get my-ang in every component as a selector.
For styling we will use Angular material which comes with simple and elegant components!
To add Angular Material run following command using angular cli
ng add @angular/material
This will install lib using npm and we will be prompted about couple of initial options
- select any default themes or if you want to customize select custom as an option later style with own theme in style.scss like this.
- install typography
Once finished we can start importing Angular material components in our app but more on that later.
The Tooling
- **Prettier** : An opinionated code formatter which integrates with most of the IDE. We can even format whole project with the help of short npm script!
Lets add it using
npm i -D prettier
Once installed, we can create .prettierrc file which allows to customize copule of formatting options as specified here. Sample configuration as shown below
{
"singleQuote" : true
}
For Angular, we can make prettier play nicely with tslint which is provided by AngularCLI,
to do that we can install tslint-config-prettier and add it in last item in the extends array filed in tslint.json file.
{
"extends" : ["tslint:recommended", "tslint-config-prettier"]
}
we can add npm script to package.json just to run the command to format code before checkin
add this piece of commands scripts section of package.json
"format:write" : "prettier \"projects/**/*.{ts,html,md,scss,json}\" --write"
- webpack-bundle-analyzer : It can help us understand content of the bundle size produced during the prod build helpful for debugging correct structure and hence architecture of our app.
Install webpack-bundle-analyzer by running command
npm i -D webpack-bundle-analyzer
once installed add following script in package.json in scripts section
"analyze" : "ng build --prod --stats-json && webpack-bundle-analyzer ./dist/<app-name>/stats.json"
Script do the following things
- builds application for production as we are using —prod flag
- collects statistics of all the modules by build because we are using —stats-json flag
- last step will call webpack bundle analyzer and specify the stats.json file.
&& operator wont work in windows just create two commands in script by dividing them
"analyze" : "ng build --prod --stats-json"
"analyze:webpack": "webpack-bundle-analyzer ./dist/<app-name>/stats.json"
running both npm commands will open a new page which will show the amount of surface covered by each module.
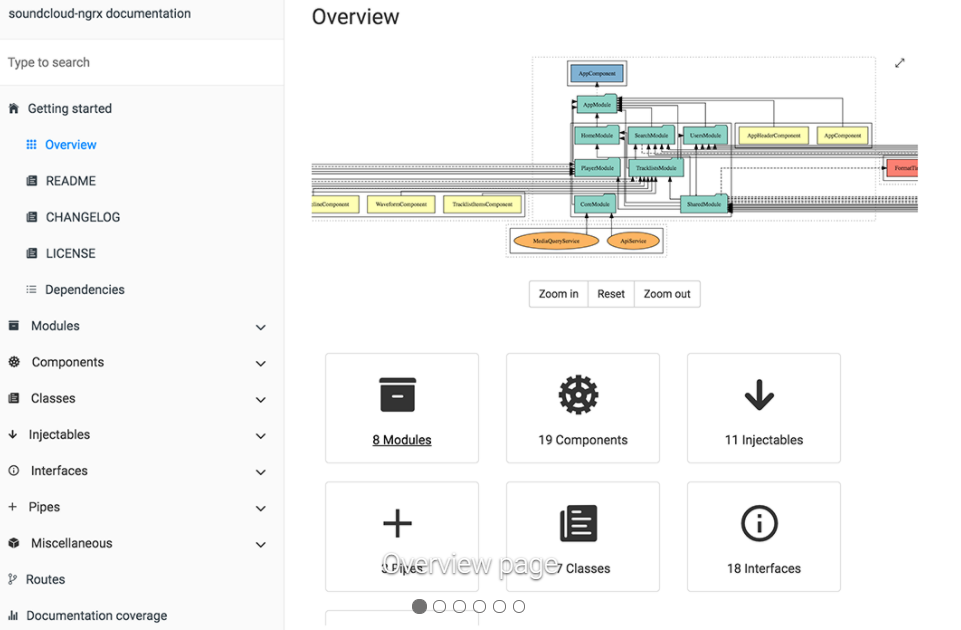
- Compodoc : Static documentation tool for angular application which generates angular documentation in seconds by parsing all the components , services and pipes etc
Install Compodoc using command globally
npm install -g @compodoc/compodoc
define a script task in your package.json
"compodoc": "npx compodoc -p tsconfig.json src"
and run it
npm run compodoc
Start the application
Run application using command
npm start
or
ng serve -o
If everything went well then application must be running in http://localhost:4200
Cool our initial setup is done. We have a workspace with empty Angular application and we have added some cool tooling to improve our developer experience!
The Architecture
Before generating and writing code lets sit back and see bigger picture
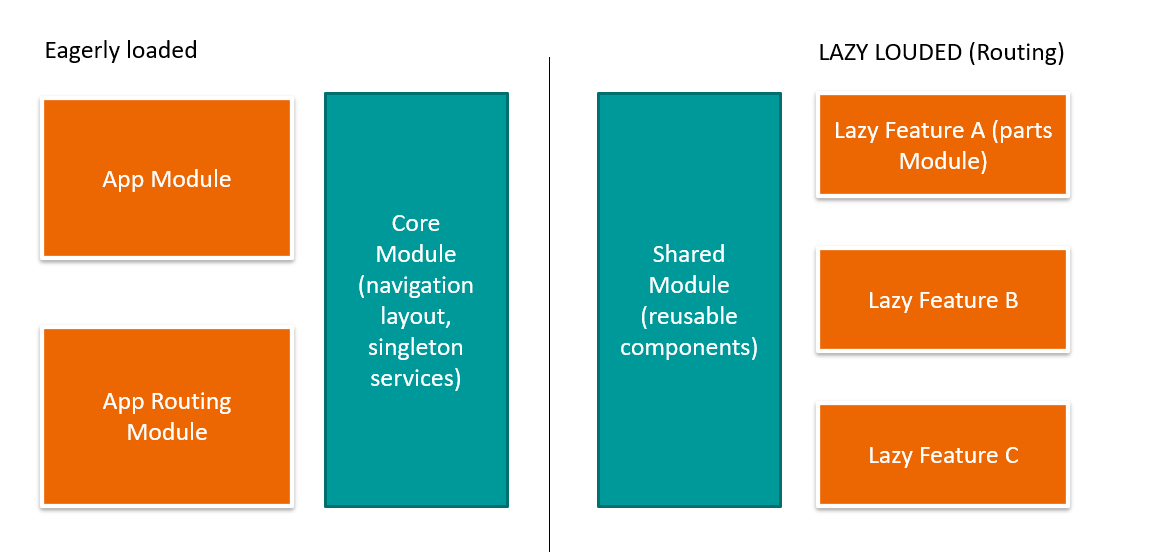 Lets organize code this way based on the functionality we implement.
We have two parts above :
Eager part which will be loaded from start(the main.js bundle).It will contain the AppModule with top-level routes and CoreModule with basic layout like navbar/main layout and all the core singleton services which will be used through out the application.
Lazy loaded part which will be loaded as a result of user navigation to these features. The lazy modules will also import shared module. Shared module consists of reusable components directives, pipes by all lazy modules hence which makes it a smaller bundle size and reasonable developer experience!
Great our architecture structure is finished ,now we can organize our code and start adding features based on functionality
Summary
We have created our angular application with extensible architecture in a very short time!
- While creating application we added --strict flag to maintain strict null checks, strict function types, restricting any type and strict property initialization
- We added necessary tools to format code(prettier), to check bundle size(webpack-bundle-analyzer) and for documentation(Compodoc)
- We saw angular architecture modules on what needs to be created at what place
- Core Module : will be the base of whole project which consists of base layout or nav bar and core singleton services
- Share Module : consists of reusable components, pipes ,directives that will be used by lazy features.
- Lazy Module :Lazy module will implement the feature business logic (services) and views(components) that are specific to features
Please support this article and developer with your claps and sharing because it helps to spread wider audience. Follow me on medium and also other blogs to get updated on tech stuff.
Other than technical stuff follow me on instagram
Till the next article ba bye!!!


